Okay! Here's another recipe dedication. This time it's for my colleague, Claudia.
Haha, she's been pestering and reminding me to make these cookies for her as she really loves them a lot, and I mean a lot.
Just so happen, I got cornflakes from NTUC(a local supermarket) last night while grocery shopping for my dinner. So I thought, why not bake 'em?
Andddddd! I baked these lovelies in the early morning of 6am. Reasons being that my cats has been trying to wake me up from 5am in the damn morning cos' they're hungry. oTL
So Claudia, Here's to you! <3~!
Cornflake Cookies
==================
190C
Baking time : 15 min
Ingredients:
-----------------------
150g Butter
150g Sugar
1 egg
2 teaspoon baking powder
200g Flour
drops of vanilla essence
Instructions:
------------------------
C.C-1: Cream Butter and Sugar together until light and fluffy
C.C-2: Add Vanilla essence and egg and mix well.
C.C-3: Fold in the flour and baking powder (the dough would be sticky)
C.C-4: Crush 100g of cornflakes and fold into the dough.
C.C-5: Line your baking sheets with parchment paper/baking paper
C.C-6: Roll bits of dough and coat them with excess crushed cornflakes and press them on the baking sheet.
C.C-7: Bake in a pre-heated over at 190C for 15 mins
C.C-8: Remove from oven and leave to cool completely.
It's that simple! I brought a ziplock-full of these lovelies for Claudia just today and She's one happy girl, literally! hahaha! If you don't like cornflakes in your cookies and only want them coating the cookies, just simply omit the adding of crushed cornflakes into the dough.
And oh, did I mention that you can use Nestum as well? It tastes as beautiful and yummy like these cornflake cookies!.
With Much love,
Sheila <3 XOXOXOXOXO
Showing posts with label Dessert. Show all posts
Showing posts with label Dessert. Show all posts
Tuesday, June 26, 2012

Monday, June 25, 2012
Pancakes for Breakfast! :B
Pancake Breakfast! This was one of the recipes that I've planned to 'complete'
Seriously, don't mind my oversized kiddy PJs, I know it looks really aloof.
Anywho, let's get started!
Ingredients:
190g all-purpose flour
10g white sugar
10g baking powder
6g salt
1 egg
45g melted butter
295ml milk
extra butter/oil for the pan
Instructions!:
P.C-1. Mix all the dry ingredients together
P.C-2. Add the wet ingredients and mix until smooth and lump free
P.C-3. Heat and oil your pan/skillet.
P.C-4. Spoon a ladle-full of batter onto the heated pan and cook until bubbles starts to burst at the surface
P.C-5. Once bubbles has burst at the surface, flip them over and cook them for another 2-3 minutes.
P.C-6. Serve on a plate with butter/honey/jam.
It's that easy! Took me about 20 minutes in total to get everything cooked and cleaned up. I love pancakes with honey! Natural sweetener, yum!
It's just too bad that there's no one else in the family to nom on them so I bought them to work as my snack. :B.
With much love,
Sheila <3 XOXOXOXO
Tuesday, June 19, 2012
microwave cookies
LO! it's another microwave recipe! LOL
I was really bored one night and went on to youtube to find random food recipes and all,
then I stumbled upon this microwave cookie recipe by Ochikeron, and I decided that I would try it out!
Ingredients:
----------------------
1/2cup = 125ml butter (softened) *100g (3.5oz.)
1/4cup = 62.5ml granulated sugar
1 egg
1cup = 250ml cake flour
1/2 tsp. baking powder
Instructions:
-----------------------------
M.C-1. Cream the butter and sugar until light and fluffy
M.C-2. Beat in the egg and mix well.
M.C-3. Fold in the cake flour and baking powder.
M.C-4. Spoon or pipe your cookie dough onto small pieces of baking paper and pop them in the microwave, on high for 2-3 minutes.
!*! Always look at the cookies, as they burn easily !*!
M.C-5. After 203 minutes, remove from microwave and leave to cool completely!
THAT"S ALL! Hahaha! this recipe is dead easy and dead fast.
You can add chocolate chips or dried fruits in, anything to your preference.
Microwave cooking often cooks food from the inside out hence it is always wise to keep an eye on your food while it's spinning round and round in the microwave.
UPDATE NOTE!
I have actually planned out recipes to start/finish up week by week so I do hope I have the time to do those and update as much as I can.
With Much Love,
Sheila XOXOXOXOXO!
Tuesday, June 12, 2012
Madeleines!
Another post up!
Well, I actually made Madeleine for the first time on Mother's day itself.
Often I'll find these beautiful sweet things selling in Delifrance, they comes in packs of 3-6?
Oven at 180C, middle Shelf/Rack
Ingredients
------------------
125g Plain Flour, Sifted 3 times
2 Eggs
170g Caster Sugar
185g Melted Butter
Instructions
--------------------
M.1 - Mix eggs and sugar in a heatproof bowl.
M.2 - Place egg mixture over a pot of boiling water ( Careful not to let the water touch the bottom of the bowl)
M.3 - Beat the mixture until pale and has thickened.
M.4 - Remove from heat and continue beating until thick
M.5 - Add melted butter and flour and fold into the batter
!.! Optional. For better looking madelienes, chill in the fridge for about 3o minutes to an hour!.!
M.6 - Spoon in the batter into a floured madeleine pan.
M.7 - Bake in a pre-heat oven at 180C for 12- 14 minutes.
M.8 - Remove and let it completely cool.
I actually didn't chill the batter before baking, that's why the top(bottom) of my madeleine are crackly and ugly.
Despite their appearances, they tasted really yummy! and it goes oh so well with any type of tea. *melts* I would sneak out one every night from the fridge and nom on them before going to bed. Fattening but oh so delicious!
With much love,
Sheila <3
Wednesday, June 6, 2012
Apple Pie~!
HOKAY! I've been craving apple pies for sometime (I crave for a lot of food actually, haha!)
I'll keep things short and sweet! :D
Ingredients
----------------------
300g Apples, peeled and chopped into bite sized cubes
100g Sugar
Half a lemon
Dough:
130g flour
100g cold butter
20-30ml cold water
Preheat oven at 230C.
*Bishi Bashi Voice* Instructions!
-------------------------------------------------
Filling:
F-1. Add apples and sugar into pot and cook over medium heat.
F-2. Squeeze half a lemon and mix well. Continue cooking until apples are soft
F-3. About 15 minutes later, remove pot from heat and leave to cool completely.
Dough:
D-1. Rub the cold butter into the flour, it should resemble bread crumbs
D-2. Add cold water bit by bit, you don't need to use it all anyway
! If the dough is too wet, add more flour. If dough is too dry, add water !
Assembly:
A-1. Press small dough balls into the mould.
~!~ If you're making a normal pie size, roll the dough out on a floured board and place the dough over the pan and adjust. ~!~
A-2. Spoon in the apple filling.
A-3. Cover with dough, Here's where you can be creative with your pie tops
A-4. Glaze your pies with 1 beaten egg.
A-5. Bake them lovelies in a preheat oven at 230C for 15 minutes
A-6. After 15 minutes, Take them out and leave them to cool completely.
*Optional*Once cooled, you have pop them in the fridge and serve later
That's all for the apple pie!
Well, you could tell that I was being lazy with my pie top, mainly because I took this video around 10PM and I'm feeling the sleepy monster attacking my body.
You can eat your apple pie with ice cream, whipped cream or anything that you like to have them with.
Wonderful for tea and dessert them lovelies. <3
With Much Love,
Sheila <3
Saturday, June 2, 2012
Vanilla Cupcake with Buttercream Frosting
Okayyy~ Might as well update some more now that it's the weekend and I'm kinda free(?)
I've made this quite a while back because I was bored and really needed to be in the kitchen to meddle around with my flours, eggs, butter and sugar. <3
So here goes!
Pre-heat Oven at 180C/350F
Ingredient list
~ Vanilla Cupcake ~
- 113g(1/2 cup) unsalted butter, softened
- 2/3 cup granulated white sugar
- 3 eggs
- 1 tsp vanilla extract/flavoring/essence
- 1 1/2 cup all purpose flour
- 1 1/2 tsp baking powder
- 1/4 tsp salt
- 1/4 cup milk
~Buttercream Frosting~
- 2 cups icing sugar
- 113g(1/2 cup) unsalted butter, softened
- 1 tsp vanilla extract/flavoring/essence
- 2 to 3 tbsp milk
Instructions!*Bishi Bashi voice*
--------------------------------------------
Pop in the video!
1. Cream butter and sugar until light and fluffy
2. Beat in one egg at a time and mix well, followed by the vanilla essence
3. Add flour and milk alternately, starting with flour and ending with flour. (flour milk flour milk flour)
4.Fill your lined cupcake/muffin pan up till 2/3 full
5. Pop them into a preheated oven of 180C, and bake them for 20 minutes.
While them babies are baking , Let's make the buttercream frosting
B.C 1. Cream icing sugar and butter together until creamy
B.C 2. Add vanilla extract and milk and mix well
*Optional* Add any other flavorings or colors that you want to have. :D
6. After 20 minutes, remove from oven and let it cool completely till room temperature.
7. When it is cooled to room temperature, prepare your piping bag with your favorite nozzle and start decorating them babies!
These can be stored in the fridge for a maximum of 3 days. But best to eat it fresh on the same day.
Enjoy them lovelies as breakfast, with afternoon tea and even a simple sweet dinner treat. You can also pack them up and give them as small food gifts to family, friends and colleagues!
If you do make them and decorated them with icing, Share your photos with us! We'll post them up and share our cute and pretty icing decorations, as well as techniques on piping and decoration! :D
With Much Love,
Sheila <3
Friday, June 1, 2012
cake in a mug: Milo Flavor
Well...Since I DO have the time, why not another post? :D
I made this Cake-In-A-Mug for breakfast in my office where I'm currently working at and this video was taken like about 2 months ago(?). Procrastination resides in nearly everyone hahaha!
I "wow-ed" many of my colleagues in office and been nicknamed by a colleague as "Mini Betty Crocker" ._.
Anywho, Heres the Ingredients!
Ingredients
-----------
2 tablespoon self raising flour
2 tablespoon sugar
1 egg
1 tablespoon milk
1 tablespoon sunflower oil
Instructions!
------------------------------
1. Mix the flour and sugar together in a mug(any mug would do! )
2. Crack one egg in and mix well!
3. Add sunflower oil and milk and mix well!
*OPTIONAL!* You can add dried fruits, chocolate bits, coffee powder, milo powder. well anything you like:)
4. Pop your mug into the microwave, on HIGH for 3 minutes.
[Timing varies with the voltage on the microwave, so just adjust the timing to get your desired cake]
5. After 3 minutes, remove from microwave and Enjoy!
This is really a great comfort food on any day or if you're really hungry but want something simple and sweet.
With Much Love,
Sheila <3
Blueberry Crumble Muffin
Hello Hello! Okay, It's been ages since I've last updated.
Have been busy with work and trying to take food tutorial videos with all the testing and all, hahaha!
I came across this recipe from a cookbook, Okashi, by a Japanese lady who bakes wonderful goodies, from cookies to cakes to even pet treats! Yay! And also the cravings for muffins has been nagging at me for quite a long while so I decided to give this recipe a go.
Oven: 180C, Middle Shelf/Rack
Ingredients:
------------------
Crumble:
20g Cold Butter
20g Top Flour/Pastry Flour
20g Caster Sugar
(I doubled my quantity to make more, but here's for 6 muffins)
Muffin:
120g Top flour/Pastry flour, sifted twice
1 tsp baking powder
50g Butter
40g Brown Sugar
30g Caster Sugar
1 Egg
60ml cold milk
100g Blueberries
Instructions! (For some reason, this reminds me of an arcade game, Bishi Bashi, Eng Ver. :3)
-----------------------------------------------------------------------------------------------
And YES! I made a video of it all! hahaha!
To make the crumble:
1. Rub the cold butter into the flour and sugar mixture.
2. Chill the crumble in the fridge.
Muffin!
1. Cream butter, sugar and brown sugar until it turns creamy and pale brown
2. Beat in the eggs and mix well
3. Fold in the flour and milk alternately, starting with flour then milk, in batches. (start with flour and end with flour)
4. Fold in your blueberries!
5. Spoon your batter into lined cupcake/muffin tray and sprinkle the crumble over the batter.
6. Pop them babies into a pre-heated oven @ 180C, and bake for 30 minutes.
7. After 30 minutes, bring the babies out to cool.
Enjoy your muffin with a cup of milk, tea, coffee or anything that you like to drink with your bakes.
Actually, I've made a few bake videos already but I didn't have the free to really upload and post it here. I'll try to update as much as possible! :DD
With Much Love,
Sheila <3
Monday, June 27, 2011
Canned Fruit Agar Agar
Woo! Double Post! YAY!


A refreshing Dessert for a hot weather here in Tropical Singapore!
Ingredient List
============
- 30g agar agar Strips
- 1200ml Water + extra water for soaking the agar agar
- sugar to taste
- Preferred Canned fruits (peach, longans, pineapple, etc)
- Optional: Flavorings + Colorings
Instructions
==========
1. Wash and soak the agar agar strips for 10 minutes.


2. While the strips are soaking, boil 1200ml of water.
3. After 10 minutes and the water is boiling, add the agar agar strips and add sugar to taste and stir occasionally to melt and prevent from burning/scalding.

4. chop up canned fruits and set aside.
5. Once fully dissolved, remove from heat and let it set for 1 minute.
6. Put chopped canned fruits into the jelly molds and scoop the agar agar over the fruits in the jelly molds.
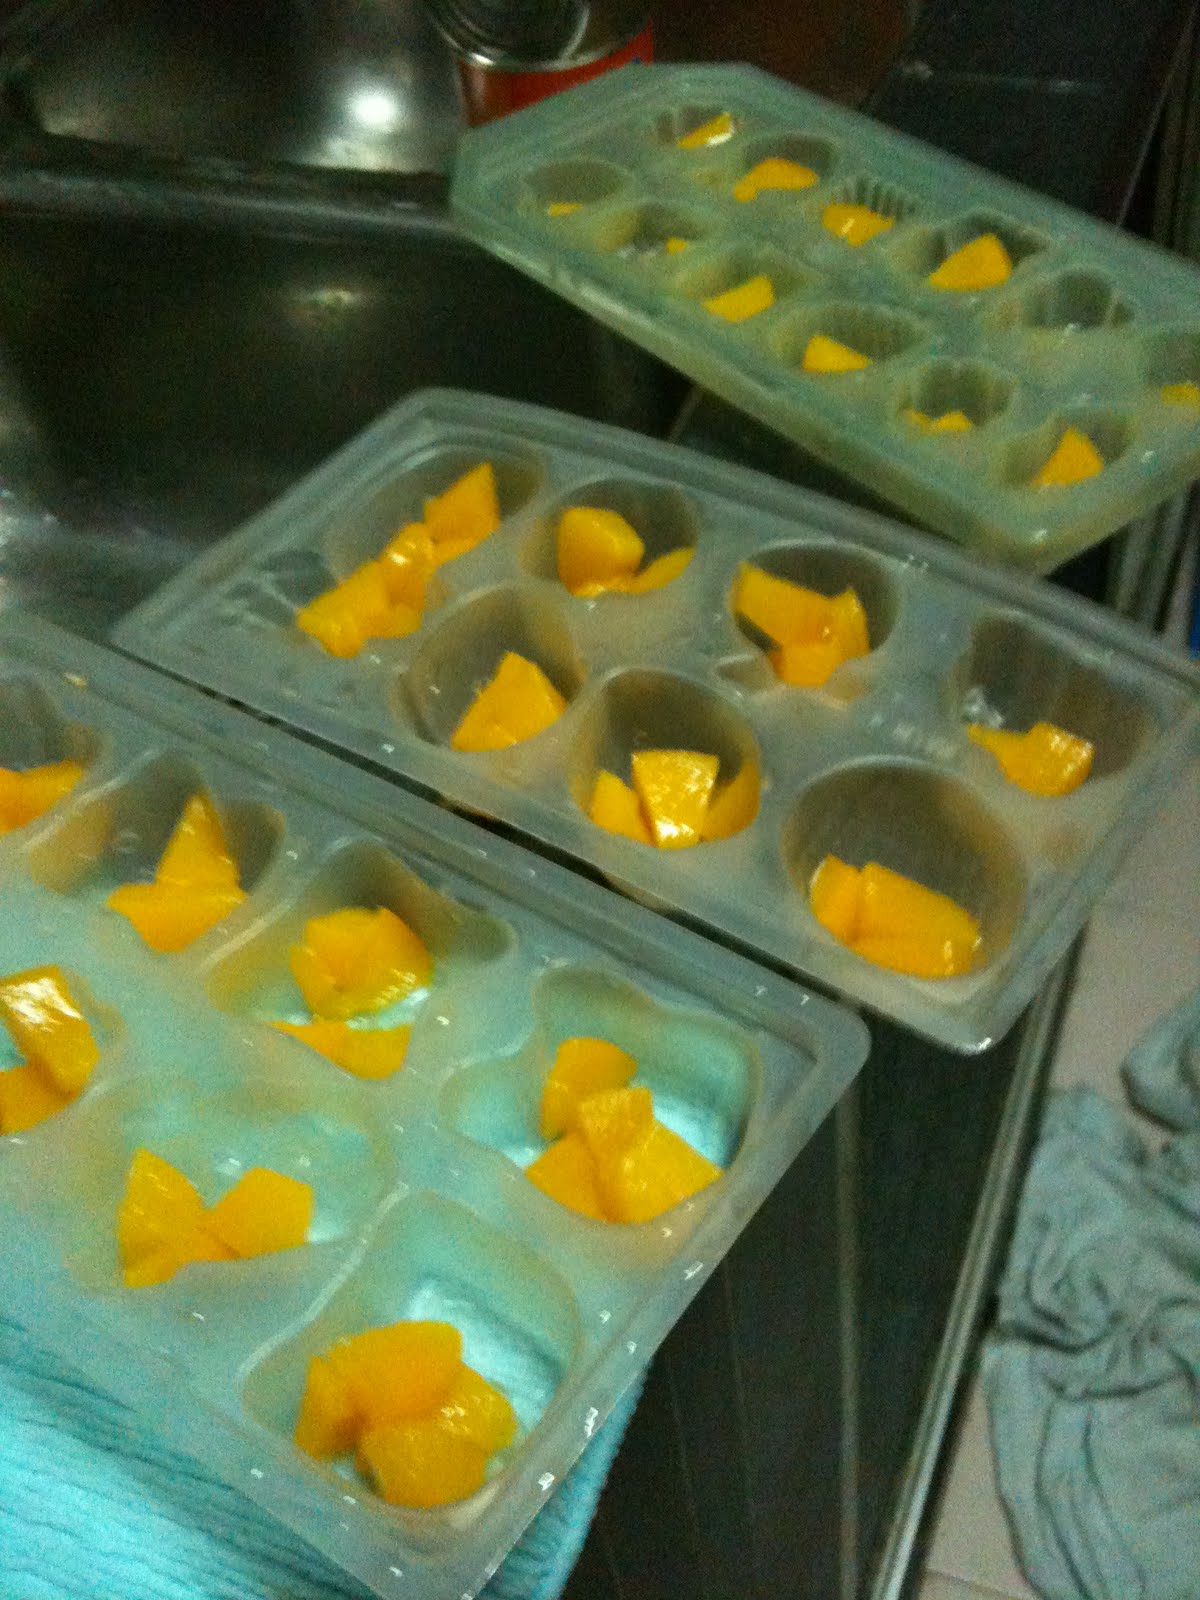
7. Leave the agar agar to completely cool and chill in the fridge.
8. Serve cold.

enjoy this yummy treat for the hot weather! yes!
Printable Recipe Available Here! : Print Page
With Love,
Sheila, Double <3
Subscribe to:
Posts (Atom)